Indulge in Homemade No-Bake Twix Bars: Your Quick & Comforting Dessert Fix
Imagine the delightful crunch of a buttery biscuit, followed by a luxurious layer of gooey caramel, all enrobed in smooth, melt-in-your-mouth chocolate. That's the iconic experience of a Twix bar. Now, imagine recreating that magic right in your own kitchen, without ever needing to turn on the oven. Enter the wondrous world of no bake Twix bars – a dessert that promises all the familiar comfort and indulgence of its candy counterpart, but with remarkable ease and simplicity.
These homemade delights are more than just a sweet treat; they're a testament to effortless baking, perfect for those moments when a craving strikes, a party calls, or you simply desire a comforting dessert without the fuss. With distinct, perfectly balanced layers and a satisfying texture in every bite, no-bake Twix bars quickly become a beloved go-to recipe for any occasion.
The Allure of No-Bake Twix Bars: A Modern Classic Reinvented
In our fast-paced lives, simplicity often wins, especially when it comes to satisfying our sweet tooth. The concept of "no-bake" isn't just a trend; it's a culinary philosophy that embraces convenience without sacrificing flavor or quality. For many, the idea of whipping up a batch of delicious bars without the heat of an oven is incredibly appealing, particularly during warmer months or when kitchen time is at a premium.
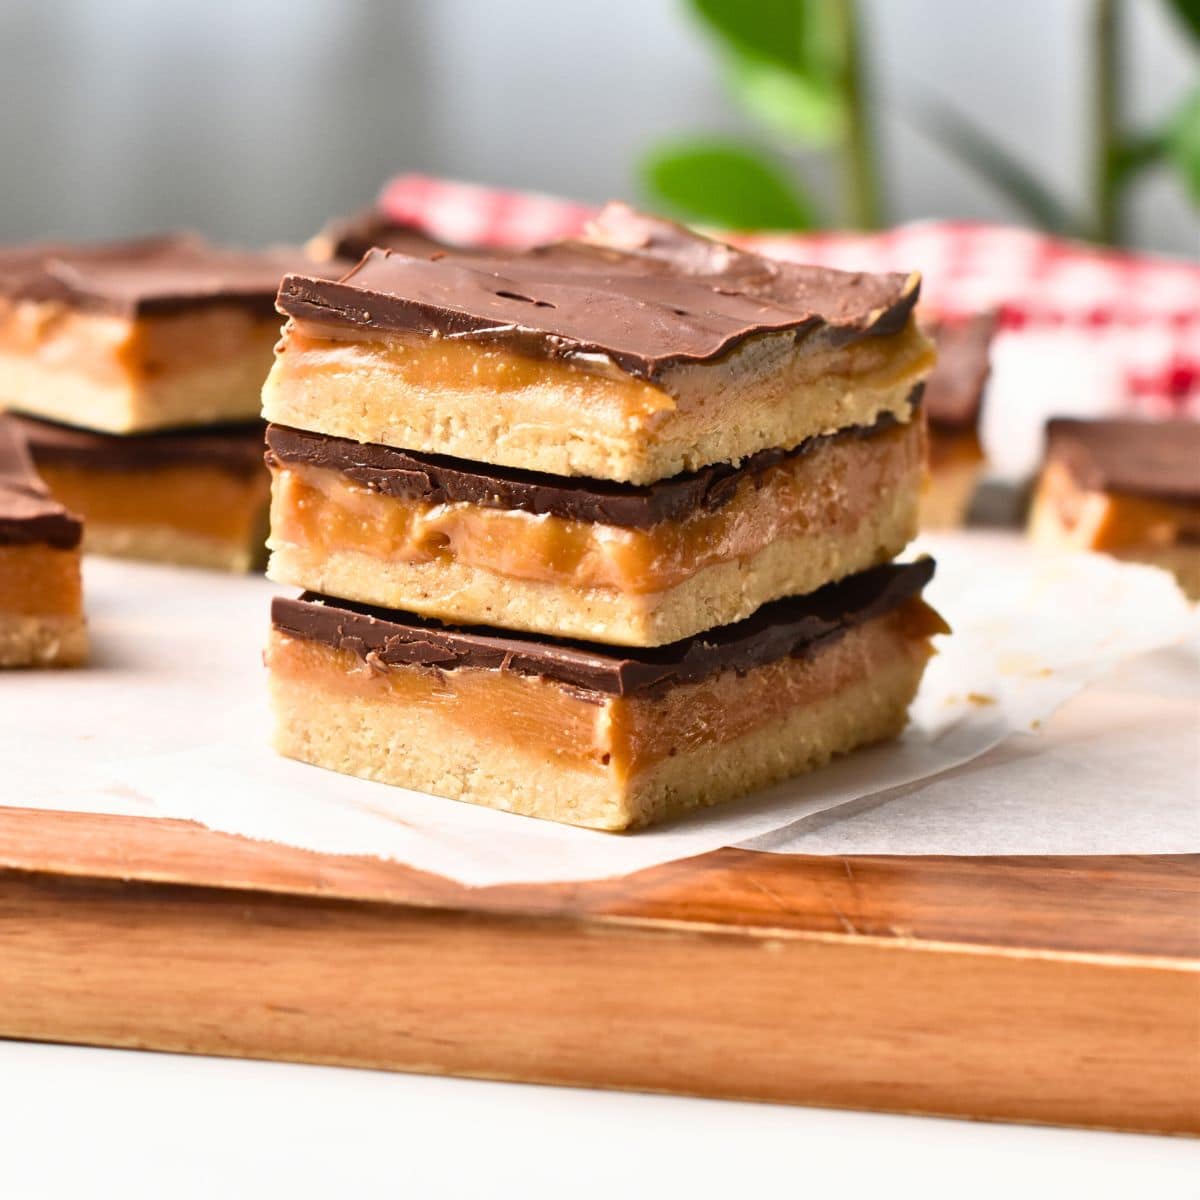
Our homemade no bake Twix bars capture the essence of the classic candy bar, transforming it into an accessible, stress-free dessert. What makes these bars so incredibly satisfying is their thoughtful construction: a sturdy, chewy base, a rich, often peanut butter-infused, caramel layer, and a crowning finish of silky chocolate. Each component works in harmony, delivering a symphony of sweet, salty, and crunchy sensations that are both nostalgic and utterly delicious.
There’s a unique satisfaction in creating a dessert that looks impressive yet comes together with minimal effort and common pantry staples. These bars don't just taste good; they offer a sense of accomplishment, proving that gourmet-level treats are well within reach for every home cook. They disappear faster than expected from any serving platter, a clear sign of a recipe that truly works and resonates with everyone who tries them.
Crafting Perfection: Mastering Each Layer of Your No-Bake Twix Bars
The beauty of homemade no bake Twix bars lies in their distinct, perfectly set layers. Achieving this balance requires attention to detail at each stage, transforming simple ingredients into a cohesive, irresistible dessert. Let's dive into perfecting each component.
The Foundation: Building a Sturdy & Chewy Base
The base is the unsung hero of any no-bake bar, providing crucial structure and a satisfying chew. While many recipes opt for a traditional graham cracker crust, similar to Whip Up Easy No-Bake Twix Bars: Your Go-To No-Oven Treat, you can also consider alternatives like shortbread cookies or digestive biscuits for a slightly different flavor profile.
- Perfecting the Dough Texture: The goal is a dough that holds together firmly but remains chewy. After combining your crushed crackers (or cookies) with melted butter and any other dry ingredients like sugar or flour, aim for a consistency that's sticky enough to bind without any visible dry patches. If you find your mixture too crumbly, a tiny splash of milk or even water can help bring it together. Conversely, if it feels overly sticky, a light dusting of extra flour will make it more manageable.
- The Power of Resting: Once mixed, let your dough rest for about 5 minutes. This seemingly small step allows the flour (if used) and other dry ingredients to fully hydrate, leading to a more cohesive and less crumbly base. It's a fundamental principle of baking that applies beautifully even to no-bake recipes.
- Creating a Uniform Layer: When pressing the dough into your chosen pan (a 9x9 inch square pan is ideal), consistency is key. Use the back of a sturdy spatula or your fingers to press down firmly and evenly across the entire surface. For an extra smooth and compact layer, a small rolling pin can be gently rolled over the dough, eliminating any potential air pockets and ensuring every bar has a consistent, satisfying bite. This uniform layer is essential for the clean cuts and structural integrity of the finished bars.
The Heart: Elevating Your Peanut Butter Caramel
The caramel layer is where the indulgence truly begins. Its rich, gooey texture and depth of flavor are paramount.
- Quality Peanut Butter Matters: For the best flavor, opt for a natural peanut butter made solely from peanuts, with minimal or no added sugars or oils. This choice significantly enhances the authentic, rich caramel taste. Avoid highly processed varieties with excessive stabilizers.
- Stir Before You Pour: If your peanut butter caramel has been sitting for a moment, give it a quick, thorough stir before pouring. Natural peanut butter can separate, with oil rising to the top. A quick stir ensures a uniform texture and flavor distribution.
- Temperature Control is Crucial: Allow your caramel mixture to cool slightly before pouring it over the chilled base. Pouring hot caramel can melt the base layer, compromising the distinct textures and potentially creating a messy, less defined final product. Patience here pays off, ensuring clear, beautiful layers.
The Crown: Achieving a Silky Smooth Chocolate Topping
The final layer is the chocolate, and its smooth, glossy finish is what truly gives these bars their candy-bar appeal. As highlighted in Mastering No-Bake Twix Bars: Tips for Perfect Layers & Texture, this step is easier than you think.
- Gentle Melting is Key: Whether you choose a double boiler or the microwave, melt your chocolate slowly and gently. Overheating chocolate can cause it to seize (become thick and clumpy) or scorch, leaving a burnt taste. In the microwave, use short bursts (15-30 seconds), stirring well after each interval until just smooth.
- The Secret to Gloss and Flow: Stirring in a teaspoon of coconut oil or cocoa butter once the chocolate is melted is a game-changer. This small addition not only helps the chocolate flow more evenly over your caramel layer, creating a beautifully smooth and level surface, but also imparts a lovely glossy finish that looks professionally done.
- Pour and Smooth: Pour the melted chocolate over the set caramel in one steady motion. Use the back of a spatula or a spoon to gently spread and smooth it out to the edges, ensuring complete coverage and a pristine appearance.
Practical Tips for Impeccable Presentation and Enjoyment
Beyond the layering, a few practical tips can elevate your no bake Twix bars from delicious to absolutely stunning, ensuring they're as pleasant to look at as they are to eat.
The Art of the Clean Cut
One of the most common challenges with layered bars is achieving neat, clean slices without cracking the chocolate or smushing the layers. The trick is surprisingly simple:
- Heat Your Knife: Before each cut, heat a sharp knife under hot running water. Wipe it completely dry to prevent water from affecting the chocolate.
- Slice and Reheat: A warm, dry knife will glide through the hardened chocolate and set caramel like butter, creating perfectly clean edges. For multiple bars, reheat your knife between each slice to maintain that smooth, precise action. The warmth helps to momentarily melt the chocolate just enough to prevent cracking and dragging, leaving a pristine edge.
Troubleshooting Common No-Bake Bar Challenges
Even with simple recipes, a few common hiccups can occur. Here’s how to navigate them:
- Crumbly Dough: If your base mixture feels too dry or crumbly to press firmly, a light spritz of water or a tiny bit more melted butter can help bind it. Add very gradually to avoid making it too wet.
- Sticky Dough: Conversely, if your base is too sticky to handle easily, a tiny dusting of extra flour or crushed crackers can absorb excess moisture and make it easier to work with.
- Layers Not Setting/Separating: The most crucial rule for beautiful, defined layers is patience. Ensure each layer is fully set in the freezer or refrigerator before adding the next. This prevents layers from bleeding into each other and maintains the distinct structure that mimics a classic Twix bar.
- Chocolate Cracking: Often caused by cutting cold chocolate with a cold knife, or by using chocolate that is too brittle (some dark chocolates are naturally more brittle). The warm knife trick is your best defense!
Storage and Serving Suggestions
Once your no bake Twix bars are perfectly set and cut, proper storage ensures they remain delicious:
- Storage: Keep the bars in an airtight container in the refrigerator. They typically last well for up to a week.
- Serving: While delicious straight from the fridge, letting them sit at room temperature for 5-10 minutes before serving can slightly soften the layers, enhancing their texture and flavor.
- Garnish Ideas: A sprinkle of flaky sea salt on top of the chocolate layer provides a sophisticated touch and beautifully enhances the sweet and salty balance. A drizzle of contrasting white chocolate can also add visual appeal.
Conclusion
Creating your own no bake Twix bars is a rewarding culinary adventure that proves you don't need a hot oven to produce an incredibly satisfying, comforting dessert. From the chewy, buttery base to the rich caramel and the smooth chocolate topping, each layer contributes to a harmonious symphony of flavors and textures that rivals its store-bought inspiration. These bars offer the perfect blend of ease and elegance, making them an ideal choice for a quick treat, a crowd-pleasing party dessert, or simply a moment of personal indulgence. So go ahead, gather your ingredients, follow these tips, and prepare to delight yourself and your loved ones with these irresistible, homemade masterpieces.
