Mastering No-Bake Twix Bars: Tips for Perfect Layers & Texture
Few treats evoke a sense of nostalgic delight quite like the classic Twix bar, with its distinct layers of shortbread, caramel, and chocolate. But what if you could recreate that magic at home, without ever turning on your oven? Enter the phenomenon of homemade
no bake Twix bars. These ingenious creations offer all the familiar comfort and balanced sweetness of the original, transformed into a simple, stress-free dessert perfect for any occasion. Whether you're seeking a quick indulgence, a crowd-pleasing party treat, or just a little sweetness without the fuss, mastering the art of no-bake Twix bars is a supremely rewarding endeavor. This comprehensive guide will walk you through essential tips and tricks, ensuring each layer – from the buttery base to the silky chocolate crown – is absolutely perfect, delivering a harmonious blend of sweet, salty, and satisfying crunch in every bite.
The Foundation of Flavor: Perfecting Your No-Bake Dough Base
The journey to an exceptional no-bake Twix bar begins with its heart: a sturdy yet delightfully chewy base. This foundational layer is crucial for the overall structure and texture of your bar, distinguishing a good no-bake bar from a truly great one.
The ideal dough texture is paramount. You’re aiming for a consistency that’s sticky enough to hold together firmly, yet free from any visible streaks of dry flour. If your dough appears crumbly or dry, don't hesitate to incorporate a tiny splash of liquid – a teaspoon of milk or even water can work wonders – to help bind the ingredients smoothly. Conversely, if your dough feels overly sticky and unmanageable, a light dusting of extra flour can make it easier to work with.
One often-overlooked secret to a superior base is allowing the dough to rest. After mixing all your ingredients, cover the bowl and let the dough sit for about 5 minutes. This brief pause gives the flour ample time to fully hydrate, resulting in a more cohesive, pliable, and ultimately chewier base. It’s a small step that yields significant textural improvements.
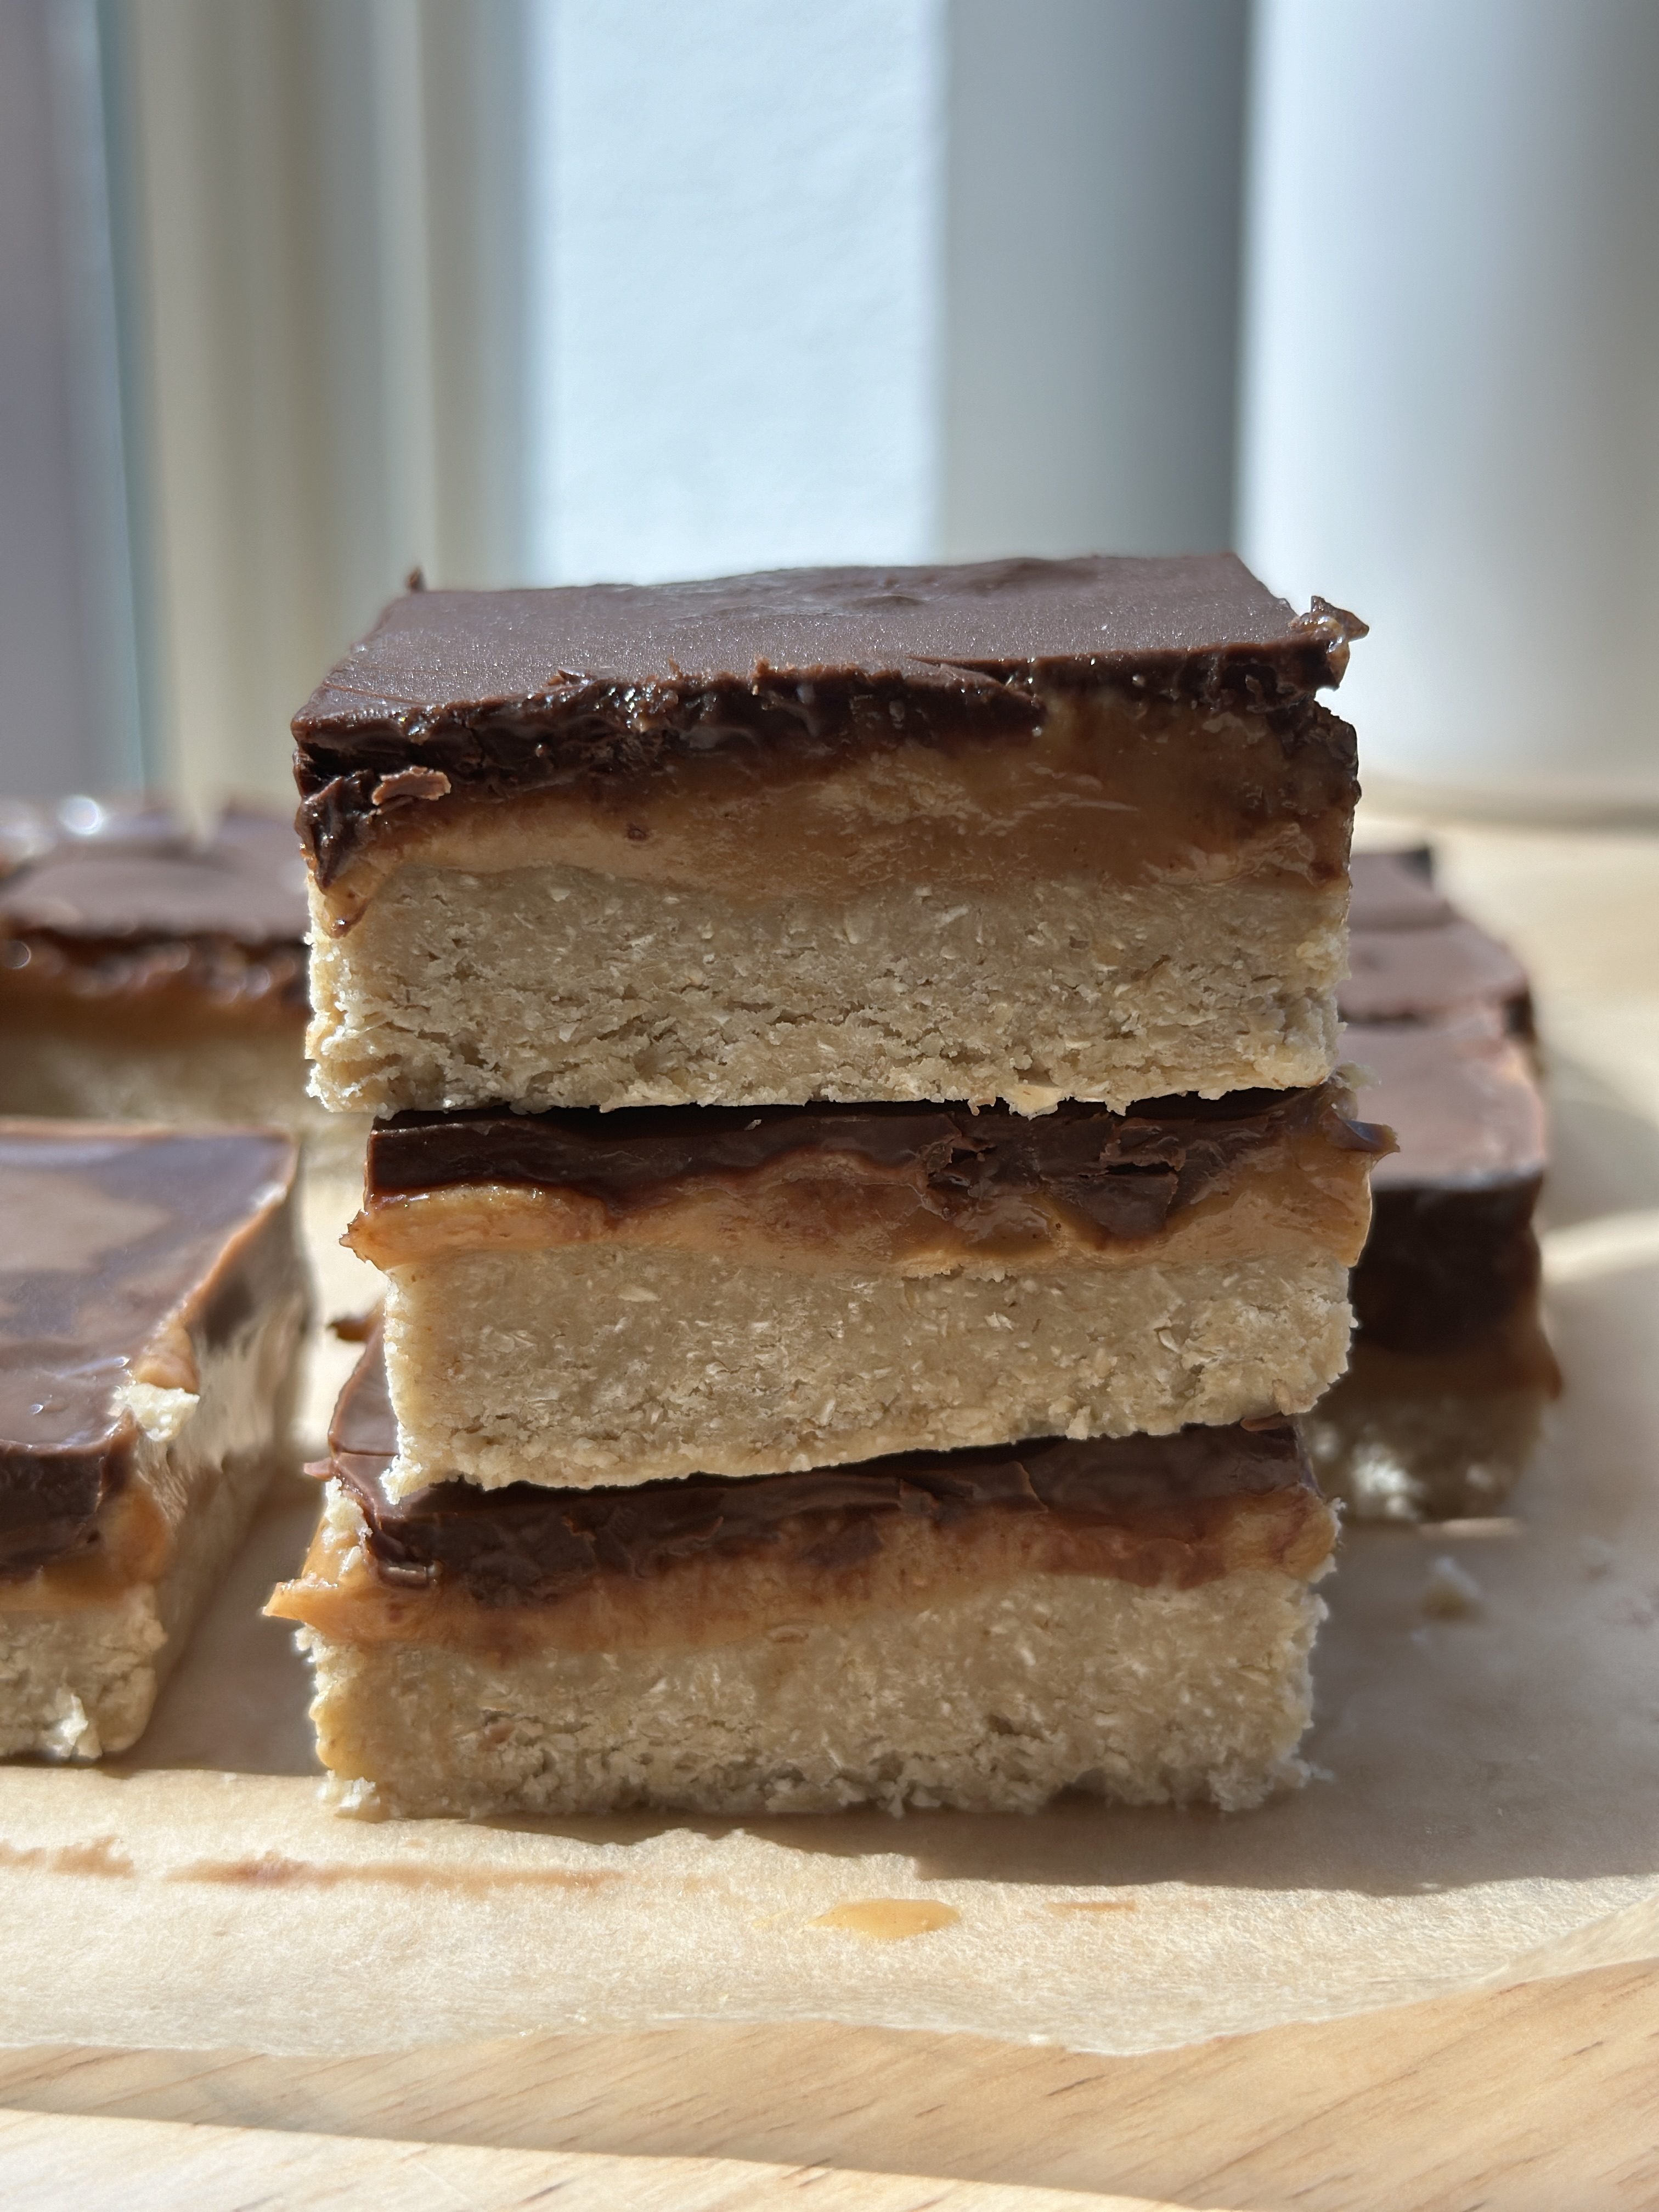
Once rested, it's time to create your uniform base. For consistency in every bite, it’s vital to press the dough into your 9x9 inch pan firmly and evenly. Use the back of a sturdy spatula, the flat bottom of a glass, or even your fingertips to ensure a smooth, compact layer. Pay particular attention to the corners and edges. If you have a small rolling pin, gently roll it over the pressed dough; this not only flattens but also further compacts the layer, helping to eliminate any hidden air pockets that could lead to a crumbly texture later on. A solid, air-free base ensures that each bar maintains its integrity and offers a satisfying chew.
Crafting the Golden Heart: Elevating Your Peanut Butter Caramel Layer
The sweet, salty, and utterly irresistible caramel layer is what truly defines a Twix bar, and in our no-bake version, a rich peanut butter caramel takes center stage. The quality of this layer can make or break your homemade treat.
The single most impactful decision you'll make for this layer is your choice of peanut butter. Opt for a natural, high-quality peanut butter, ideally one where the ingredient list states nothing more than "peanuts." These varieties offer a purer, more intense peanut flavor that genuinely enhances the depth of the caramel, without the added sugars or oils found in highly processed alternatives. The natural oils also contribute to a smoother, more luxurious caramel consistency.
Before pouring your lusciously warm peanut butter caramel over the base, give it a thorough stir. Especially if it has been sitting for a moment, natural separation of oil can occur, leading to an inconsistent texture. A quick stir ensures everything is perfectly emulsified and ready to spread.
Perhaps the most critical tip for this layer concerns its temperature. While you want the caramel warm enough to pour and spread, it must be allowed to cool slightly before it touches the dough base. Pouring overly hot caramel onto your prepared base can cause the delicate dough layer to melt and soften, compromising the distinct textural separation between the layers – a hallmark of a true Twix bar. Think "warm, not hot." Once poured, gently spread it evenly across the base. Then, this layer needs adequate time to set. Pop the pan into the freezer for at least 20-30 minutes, or until the caramel is firm to the touch. This step is non-negotiable for achieving those clear, defined layers we all love.
The Silky Crown: Achieving a Flawless Chocolate Topping
The grand finale of your
no bake Twix bars is the rich, glossy chocolate topping. This layer not only adds visual appeal but also provides that satisfying snap when you bite into the finished bar. Achieving a smooth, unblemished chocolate layer is simpler than you might think with a few key techniques.
The secret to perfectly melted chocolate lies in patience and gentle heat. Whether you use a double boiler or a microwave, melt your chocolate slowly. For the microwave method, use short bursts (15-30 seconds at a time), stirring thoroughly between each burst. This gradual approach prevents the chocolate from scorching, seizing (becoming thick and grainy), or developing a dull finish.
Once your chocolate is mostly melted and smooth, stir in a small but mighty ingredient: a teaspoon of coconut oil or cocoa butter. This addition is a game-changer. It lowers the melting point of the chocolate ever so slightly, making it more fluid and easier to spread evenly over the caramel layer. Furthermore, it contributes to a beautiful, glossy sheen once the chocolate sets, mimicking the professional finish of store-bought candy bars.
With your enhanced melted chocolate ready, pour it in one steady motion over the chilled caramel layer. Work relatively quickly but gently, using a spatula or the back of a spoon to spread the chocolate evenly to the edges of the pan. Avoid overworking the chocolate, as this can incorporate air bubbles. Once smoothed, return the entire pan to the freezer for a final chill. This firm setting ensures the chocolate becomes solid and ready for clean cutting. The visual distinction of the three layers – base, caramel, and chocolate – is a testament to your careful craftsmanship, resembling the structure of a classic Twix bar. You can find more tips on creating delightful easy no-bake desserts here:
Whip Up Easy No-Bake Twix Bars: Your Go-To No-Oven Treat.
The Art of the Clean Cut: Finishing Touches and Presentation
You've meticulously crafted each layer; now, the final step is to cut your
no bake Twix bars into beautifully neat, irresistible portions. A clean cut not only makes for an appealing presentation but also ensures the integrity of your layers.
The most effective technique for clean cuts involves a warm knife. Heat a sharp knife under hot running water for a few seconds, then wipe it completely dry with a clean towel. A warm, dry blade will glide through the hardened chocolate and set layers without dragging, cracking, or smudging. For the best results, reheat and dry your knife between *each* slice. This maintains the smooth cutting action, preventing the chocolate from sticking and creating jagged edges.
Before even thinking about cutting, it is absolutely crucial that all layers are fully set and thoroughly chilled. Attempting to cut the bars before they are firm will lead to messy, squashed layers and an unsatisfactory outcome. A minimum of 1-2 hours in the freezer after the chocolate layer is applied is usually sufficient, or even overnight in the refrigerator for ultimate firmness.
If, during the process, you encounter any general troubleshooting issues – perhaps your base feels a little too crumbly even after resting, or a layer isn't setting quite right – remember that small adjustments can save the day. A light spritz of water or milk can aid a crumbly dough, while a tiny dusting of flour can tackle stickiness. And always, always prioritize fully setting each layer in the freezer before adding the next. This dedication to precise chilling is the ultimate guarantor of those distinct, clear layers that make homemade no-bake Twix bars so iconic and enjoyable. For more comforting no-bake dessert ideas, check out this article:
Indulge in Homemade No-Bake Twix Bars: Quick & Comforting Dessert.
Mastering these tips transforms the simple concept of no-bake Twix bars into a culinary triumph. The satisfaction of slicing into a tray of perfectly layered, neatly cut bars is immense, and the joy of sharing these delightful treats with others is even greater. They disappear faster than expected because they're consistently delicious, beautifully presented, and undeniably comforting. With these techniques in your arsenal, you're ready to create a dependable dessert that truly shines, proving that sometimes, the simplest wins are the sweetest.